|
Tutorial: Adding Hosts for Monitoring
Before configuring the hosts, please be sure to setup at least one notification contact. You can learn how to configure contacts in the Contact Management tutorial.
To access the host configuration screen go to My Account and click on Host Management:

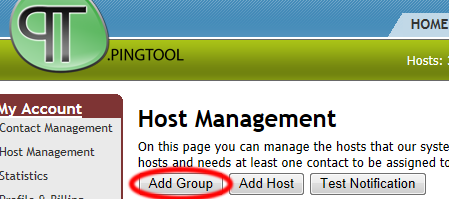
All hosts are arranged into groups, and each group is assigned one or more contacts to be notified when a hosts from that group goes offline. So first we need to add a group to hold the hosts. To do that click on the Add Group button on the Host Management screen:

A Group Settings dialog box will appear. Here you need to simply give a name to your group. This name is used only on the Host Management screen and is only for your reference. Type in the name and click the Add button to add the new group:
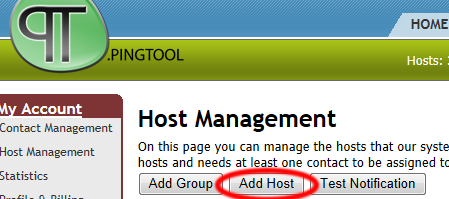
The new group will now appear on the Host Management screen. Now it is time to add a host to this group. Click on the Add Host button to do that:

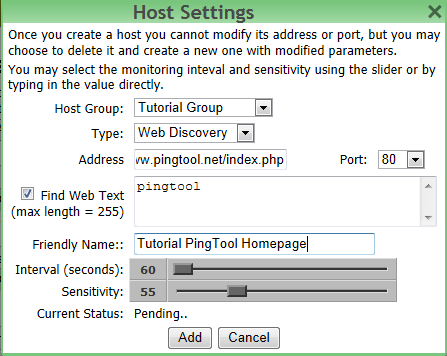
You should now see a Host Settings dialog. Here you can configure all the monitoring parameters for this host. First you select the Host Group to which this host should be added. Then you have to choose a type of monitoring you want to perform (learn more about Monitoring Types).
In the address field you have to type in either the IP address or the fully qualified domain name (i.e. server.pingtool.net) of the host. For Web Discovery you can append the host name with a specific page name if only a specific page monitoring is required (i.e. www.pingtool.net/login.php).
Then based on the monitoring type you selected, you may have to either type in or select a port on which to monitor your host (i.e. port 21 for FTP server, port 80 for HTTP server, etc.). Further more (if you selected Web Discovery type of monitoring) you can enable the Find Web Text option which will try to match up a provided text to the content returned by the web-server and report the server to be offline if there is no match found.
Friendly name is the name included in notification messages alongside the host address.
Choose a monitoring interval using the slider or by typing it in directly. Depending on your account the minimum interval may vary but the maximum is 1 hour.
Choose the sensitivity for monitoring. The higher the sensitivity the faster you will get a notification about host being offline, but at the same time there is a higher chance that it is a false alarm (for example due to a delay in network communication).
Click Save to complete the creation of the host.
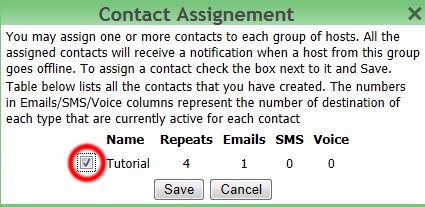
The newly created host will now appear under the group you selected. Before you enable the monitoring you should first assign a contact to the group. Click on the Contact Assignment link to do that.

In the assignment dialog select the contacts that you want to be notified when any of the servers in this group go offline and click Save.
With contact(s) assigned you can complete the process by enabling the monitoring of the host. Simply check the box next to the host you want to monitor and you are done:
Home | About Us | Terms Of Use | Privacy Policy | Contact Us | © 2008-25 NN-TEK, LLC |


